Microsoft Corporation
Summary: The new OneNote 1.1 Type Library includes functionality which enables you to programmatically import images, ink, and HTML into OneNote.
Contents
Using the CSimpleImporterClass
For Service Pack 1 (SP1) , Microsoft® Office OneNote™ 2003 adds extensibility functionality that enables applications to interoperate with it in an important, fundamental way
Note These extensibility features are only available in the OneNote 2003 Service Pack 1. Download a copy of OneNote 2003 Service Pack 1 from Office Online.
OneNote SP1 exposes a single class, CSimpleImporterClass, which enables you to add content to an OneNote notebook programmatically. You can add text in html form, images, and even ink from a Tablet PC. The CSimpleImporterClass enables you to specify where in the notebook you want to place the content; you can even create folders, sections, and pages for content, and then programmatically display the desired page. The import functionality of OneNote also lets you later delete the content you import.
The CSimpleImporterClass consists of two methods:
To use the CSimpleImportClass, you must add a reference to the OneNote 1.1 Type Library to your project. To add a reference, in Visual Studio .NET, on the Solution Explorer window, right-click References and then click Add Reference. On the COM tab, select OneNote 1.1 Type Library in the list, click Select, and then click OK.
While this article focuses on implementing the import functionality in OneNote using .NET-based languages, you can also use the OneNote 1.1 Type Library with unmanaged code, such as Microsoft Visual Basic® 6.0 or Microsoft Visual C++® development system.
The Import method has the following signature:
Import (bstrXml as String)
The method takes an xml string describing the content object(s) you want to import, as well as the location in the notebook where you want them placed. You can also use the Import method to delete objects you have previously placed in the notebook.
When called, OneNote executes the Import method with minimal intrusion on the user. OneNote does open if it is not already opened, which means the OneNote splash screen displays. But it does not change the user's location in the notebook if OneNote is already running. To change the focus of the OneNote application to the new content, use the NavigateToPage method, discussed later in this article.
If the Import method fails, OneNote does not display an error to the user. However, the COM interface does return one of the following errors to the application making the call:
| Error Name | Error Type |
| MALFORMED_XML_ERROR | 0x80041000 |
| INVALID_XML_ERROR | 0x80041001 |
| ERROR_CREATING_SECTION | 0x80041002 |
| ERROR_OPENING_SECTION | 0x80041003 |
| SECTION_DOES_NOT_EXIST_ERROR | 0x80041004 |
| PAGE_DOES_NOT_EXIST_ERROR | 0x80041005 |
| FILE_DOES_NOT_EXIST_ERROR | 0x80041006 |
| ERROR_INSERTING_IMAGE | 0x80041007 |
| ERROR_INSERTING_INK | 0x80041008 |
| ERROR_INSERTING_HTML | 0x80041009 |
| ERROR_NAVIGATING_TO_PAGE | 0x8004100a |
OneNote parses the XML file in a linear manner. If OneNote encounters an error, it terminates the import and does not process any subsequent content in the file. Any previous, successful imports from the file are not rolled back. For example, suppose you generated an XML file that contained two <EnsurePage> elements and two <PlaceObjects> elements. Unfortunately, the first PlaceObjects element passes a non-existent GUID as its pageGUID attribute. In this case, OneNote retains any folders, sections, and pages created through the <EnsurePage> elements. The first <PlaceObjects> element fails, and once it does, OneNote terminates the import and doesn't read the rest of the file, whether or not the second <PlaceObjects> element is correctly constructed.
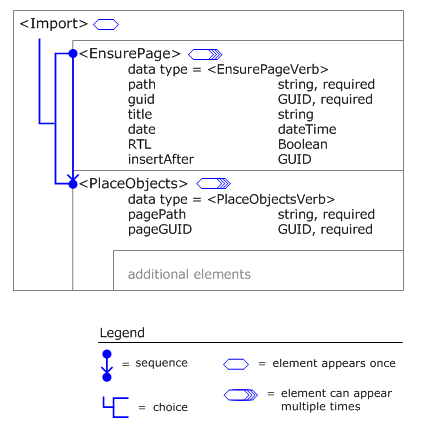
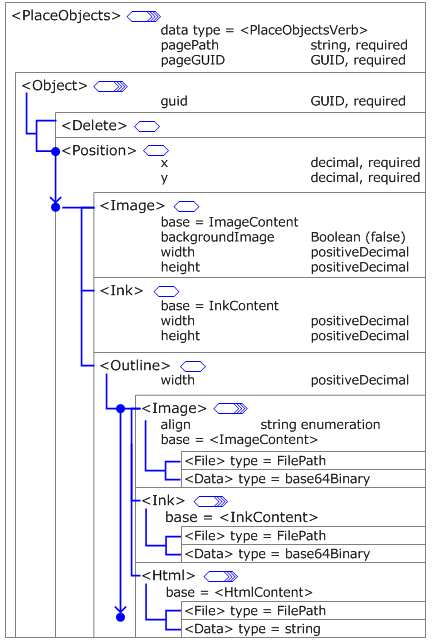
The following figures outline the xml schema to which the import file must adhere.

Figure 1. XML Schema Structure of the Import Root Element

Figure 2. Schema Structure of the PlaceObjects Element
Note The namespace for the Import method is different in the release version of OneNote 2003 SP1 than the namespace for the SP1 preview.
The namespace for the OneNote SP1 Preview is:
While the namespace for OneNote SP1(release version) is:
If you created an application to work with OneNote SP1 Preview, you must update that application with the new namespace for it to function properly with OneNote 2003 SP1.
There are two elements directly below the root <Import> element. Use the first element, <EnsurePage>, to make sure the folder, section, and page on which you want to place content exists. Use the second element, <PlaceObjects>, to place or delete objects from the page. The schema requires that the root element contain either at least one <EnsurePage> or <PlaceObjects> element.
Before you import content, the target pages for that content must exist in the OneNote notebook. Use the <EnsurePage> element to verify or create the target pages for your content. For each page you specify in an <EnsurePage> element, OneNote checks to determine if the page exists, and if not, creates it. You can even create notebook folders and sections by specifying folders or sections that don't exist.
You are required to pass OneNote a string representing the path to the desired page, as well as a GUID for that page. If the path is not fully-qualified, OneNote assumes the string starts from the notebook root location for the user. Additionally, you can specify the title, date, reading direction, and page placement relative to other pages in the notebook.
Note All GUIDs passed to OneNote methods must be in registry format, which includes being surrounded by curly braces ({}).
By default, OneNote inserts each new page at the end of the specified section. If you specify a page GUID for the insertAfter attribute, OneNote inserts the new page as a sub-page of the page whose GUID you specified. In such cases, the sub-page shares the title and date with the other pages in the page series. If the page you specify does not exist (for example, if it was never added, or the user deleted it), then OneNote inserts the new page at the end of the specified section, with any specified title and date values.
Consider the following example. This <EnsurePage> element specifies a page in the OneNote section title Negotiations, in the folder Johnson Contract, in the user's root notebook folder. The page is titled "Budget Concerns".
<EnsurePage path="Johnson Contract\Negotiations.one"
            guid="{8FDD3C41-5BB5-4595-B019-7E7E9BC9D38E}"
            title="Budget Concerns"/>
OneNote uses the optional attributes of the <EnsurePage> element when it creates a new page. If you specify attributes for an existing page, OneNote leaves the page attributes unchanged. For example, if you use a GUID for an existing page, and specify a title that differs from that page's current title, OneNote does not change the page title.
Additionally, OneNote only searches the path you specify for the desired page GUID. If the page GUID does not exist in the specified section, OneNote creates it; it does not look for the GUID in other sections of the notebook.
You can use multiple <EnsurePage> elements to create multiple pages within the OneNote notebook. You are not required to include an <EnsurePage> element for each page on which you want to place content. However, if you use the <PlaceObjects> element to try and place objects on a page that does not exist, the Import method fails. In some cases, this may be the desired outcome; for example, if you only wanted to update content on a page if the page still exists, and not add the content if the page has been deleted by the user.
Once you ensure that the pages onto which you want to import data exist in the OneNote notebook, you can start placing objects on them using the <PlaceObjects> element. You can import multiple objects to multiple pages if desired. You create a <PlaceObjects> element for each page on which you want to place content. Same as the <EnsurePage> element, <PlaceObjects> has two required attributes: the path to the page, and the GUID assigned to the page. You must include at least one <Object> element in each <PlaceObjects> element.
To create the xml string that describes the content you want to import into OneNote, follow these general steps:
Some other technical requirements to remember as you create the xml string:
To update objects that are already in a notebook, simply re-import the objects to the same page, using the same GUIDs. Be aware, however, that re-importing an object overwrites that object without notifying the user. Any changes made to the content since it was last imported are lost.
To delete an object, place the <Delete/> element within the object element. To delete an object, you must be able to identify it by its GUID and path. In practical terms, this generally means an application can only delete objects it places in OneNote to begin with. However, if the application stores the GUID across sessions, it can delete objects it imported into OneNote in previous sessions. You cannot delete folders, sections, or pages, even those you created.
Below is an example of what a typical xml string for the Import method might resemble. This xml file describes the placement of three new objects onto an existing page, and the deletion of an object already contained on that page.
<?xml version="1.0"?>
<Import xmlns="http://schemas.microsoft.com/office/onenote/2004/import">

  <EnsurePage path="MSN Instant Messenger\Conversations.one"
              guid="{8FDD3C41-5BB5-4595-B019-7E7E9BC9D38E}"
              title="Personal"
              date="2003-10-16T17:30:00-08:00"
              insertAfter="{05239BEA-894E-406d-80AD-8678D1BC1EDD}"/>

  <PlaceObjects pagePath="MSN Instant Messenger\Conversations.one"
                pageGuid="{8FDD3C41-5BB5-4595-B019-7E7E9BC9D38E}">

    <Object guid="{5FCFD7F9-02C2-42fc-B6AF-7A8450D43C2D}">
      <Position x="72" y="72"/>
      <Image backgroundImage="true">
      <File path="c:\image.png"/>
      </Image>
    </Object>

    <Object guid="{F6FC4149-1092-48ea-806D-0067C8661A18}">
      <Position x="72" y="72"/>
      <Ink>
        <File path="c:\ink.isf"/>
      </Ink>
    </Object>

    <Object guid="{7EA551C4-F778-40ce-9181-21A3DB6D33CA}">
      <Position x="72" y="432"/>
      <Outline width="360">
        <Html>
          <Data>
            <![CDATA[
              <html><body><p>Sample text here.</p></body></html>
              ]]>
          </Data>
    </Html>
    </Outline>
    </Object>

    <Object guid="{1A6648BA-D792-48f1-AC6A-43DF6E258851}">
   <Delete/>
  </Object>

  </PlaceObjects>

</Import>
The following example demonstrates a basic implementation of the OneNote import functionality. The code displays a dialog that enables the user to select an xml file, and then passes the contents of that xml file as an argument for the Import method. This example assumes the xml file conforms to the OneNote data import schema. This example also assumes the project contains a reference to the OneNote 1.0 Type Library.
Dim strFileName As String
Dim XmlFileStream As StreamReader
Dim strImportXml As String
Dim objOneNote As OneNote.CSimpleImporterClass

OpenFileDialog1.Filter = "XML files (*.XML)|*.XML|Text files (*.TXT)|*.TXT"
OpenFileDialog1.ShowDialog()
strFileName = OpenFileDialog1.FileName()

objOneNote = New OneNote.CSimpleImporterClass
XmlFileStream = New StreamReader(strFileName)
strImportXml = XmlFileStream.ReadToEnd
objOneNote.Import(strImportXml)

XmlFileStream.Close()
For the sake of simplicity, so as to highlight how the Import method is implemented, the following example assumes that an XML file is already created to use as the string for the Import method. In most cases, however, the application that calls the Import method first creates the XML string itself. For more information on creating XML using the .NET framework, see Well-Formed XML Creation with the XMLTextWriter.
In addition, most applications need to create and assign GUIDs to the pages and objects they create. Use the NewGuid method to create a new GUID, and the ToString method to get the string representation of the value of GUID, which the XML string requires. For more information, see GUID Structure in the .NET Framework Class Library.
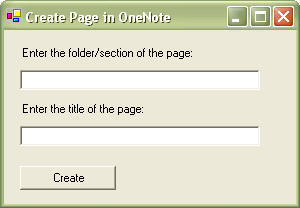
The following example demonstrates how you can programmatically generate xml strings and object GUIDs for use with the OneNote import functionality. In this sample, the user specifies a location, and optionally, a title, for a new page that the application then creates using the CSimpleImporterClass.Import method.

Figure 3. Sample Application Interface
Once the sample has stored the user input in two variables, it calls the NewGuid method to generate a new GUID for the page to create. Note that because the NewGuid method is a shared method, you do not have to instantiate a Guid object in order to call it. OneNote only accepts GUIDs in registry format, which includes curly braces ({}). However, the NewGuid method does not generate GUIDs in registry format. In order for OneNote to correctly process it, you must first wrap the generated GUID in curly braces.
The sample then constructs the simple xml document required for the Import method. The code employs an XMLTextWriter object and its various methods to generate an xml stream. The code creates <Import> and <EnsurePage> elements and their required attributes. If the user specifies a page title, the code creates the optional title attribute of the <EnsurePage> element as well. Once it has created the xml stream, it flushes the XmlTextWriter object and moves the position back to the beginning of the stream.
At this point, the code uses a StreamReader object to write the contents of the xml stream to the console, to demonstrate what the xml generated looks like. Because the Import method takes a string, not a stream, the code uses the StreamReader.ReadToEnd method to get a string representing the contents of the xml stream. The code then passes this string as the required argument to the Import method, thereby creating the desired page. Finally, the code calls the NavigateToPage method, and passes it the page path and page GUID variables set earlier, in order to navigate to the new page in OneNote.
Imports System.Xml
Imports System.IO
...
    Private Sub btnCreate_Click(ByVal sender As System.Object, _
        ByVal e As System.EventArgs) Handles btnCreate.Click
        Dim pagePath As String
        Dim pageTitle As String
        Dim pageGuid As String
        Dim XmlImportStream As MemoryStream = New MemoryStream
        Dim XmlImportWriter As XmlTextWriter = _
            New XmlTextWriter(XmlImportStream, Nothing)
        Dim strEnsurePage As String
        Dim OneNoteImporter As OneNote.CSimpleImporterClass

        'store user input for path and optional page title
        pagePath = Me.txtPagePath.Text.ToString
        pageTitle = Me.txtPageTitle.Text.ToString
        'generate a new GUID for the page to be created
        pageGuid = "{" & Guid.NewGuid.ToString & "}"

        'Generate the xml as a stream
        With XmlImportWriter
            .WriteStartDocument()
            'Generate root Import element
            'and specify OneNote schema namespace
            .WriteStartElement("Import")
            .WriteAttributeString("xmlns", _
                "http://schemas.microsoft.com/office/onenote/01/2004/import")
            .WriteStartElement("EnsurePage")
            'Generate required path attribute
            .WriteAttributeString("path", pagePath)
            'Generate required GUID attribute
            .WriteAttributeString("guid", pageGuid)
            'Generate opotional title attribute, if title was specified
            If Not pageTitle = "" Then
                .WriteAttributeString("title", pageTitle)
            End If
            .WriteEndElement()
            .WriteEndElement()
            .WriteEndDocument()
        End With
        'Flush the xmltextwriter
        XmlImportWriter.Flush()
        'Move to the start of the xml stream
        XmlImportStream.Position = 0
        'Create a streamreader for the xml stream
        Dim XmlImportReader As StreamReader = New StreamReader(XmlImportStream)
        'Write the xml stream to the console
        Console.WriteLine(XmlImportReader.ReadToEnd)
        Console.ReadLine()
        'Move back to the start of the xml stream
        XmlImportStream.Position = 0
        'Store entire xml stream in variable as a string
        strEnsurePage = XmlImportReader.ReadToEnd
        'Create instance of OneNote simple importer
        OneNoteImporter = New OneNote.CSimpleImporterClass
        'Pass xml string to import method to create page
        OneNoteImporter.Import(strEnsurePage)
        'Navigate to new page, based on path and GUID variables
        OneNoteImporter.NavigateToPage(pagePath, pageGuid)

End SubBy design, when the Import method executes the user is not distracted by OneNote displaying data they may not want to see, or worse, navigated away from the OneNote page currently in use. Also, in the cases where you import multiple objects to multiple pages, OneNote does not have to make assumptions about which page the user wants to see, if any.
To display a specific page, use the NavigateToPage method. If OneNote is not open, this method opens OneNote to the specified page. If OneNote is already open, the method navigates to the specified page in the current instance of OneNote.
To select the page to display, you must specify the path to the page, as well as the GUID for that page. If you specify a page that does not exist, OneNote returns an error.
The NavigateToPage method has the following signature:
NavigateToPage(bstrPath as String, bstrGuid as string)
The new import functionality in OneNote opens up exciting possibilities for interacting with other applications. Any application that can save data (either its own or another application's) as html text, images, or ISF can now push that content into OneNote and place it wherever you want. And as long as the application retains the GUIDs used, it can update or delete the content it pushed whenever necessary.